Wi-Fi Dead Zones: How to Get a Strong Signal in Every Room
Tired of your Wi-Fi dropping the second you walk into the kitchen? Learn how to fix dead zones with optimal router placement, mesh networks, and a clever aluminum foil trick. Get your home fully connected and stress-free today.
Imagine this: you've just settled into the guest bedroom, the thermostat is set to a crisp 68 degrees Fahrenheit, and you're ready to stream a new documentary. You pull out your phone to Venmo your friend for last night's DoorDash order, and suddenly... nothing. The dreaded "No Internet Connection" banner pops up. Or maybe you're in the upstairs home office, trying to finalize a Zoom call, and your connection drops completely, leaving your coworkers staring at a frozen, unflattering pixelated version of your face.
Welcome to the infuriating world of Wi-Fi dead zones.
Here at Onyx Sound Lab, we spend a lot of time talking about frequency therapy, soundscapes, and cultivating a peaceful home environment. But let's be real: it is incredibly hard to maintain your zen when your smart speaker keeps losing connection mid-meditation because your router is acting up. Tech frustration is a massive source of daily cortisol spikes. A buffering sound bath is the exact opposite of relaxing.
If you want to bring harmony back to your space, you need to fix your home network. Today, we are going to walk through exactly how to banish Wi-Fi dead zones for good, ranging from a completely free DIY hack to the ultimate whole-home upgrade.
The Frequency Foundation: 2.4 GHz vs. 5 GHz
Before we start moving furniture around, we need to talk about frequencies. Most modern routers are "dual-band," meaning they beam out two different Wi-Fi frequencies: 2.4 GHz and 5 GHz. Understanding the difference between these two is the secret to solving half of your connectivity issues.
Think of the 5 GHz band as a sports car. It is incredibly fast, but it gets terrible gas mileage and absolutely hates speed bumps. It gives you the fastest speeds for streaming and gaming, but it cannot penetrate walls, doors, or floors very well.
On the other hand, the 2.4 GHz band is like a rugged Jeep. It's not going to win any drag races, but it can bust through brick walls, floors, and furniture. While Wi-Fi signals don't travel for miles, a 2.4 GHz signal will reach significantly farther across your house than a 5 GHz signal.
Actionable Tip: If you're in a room far from your router and your device is struggling to load a webpage on the 5 GHz network, go into your phone or laptop's Wi-Fi settings and manually switch to the 2.4 GHz network. That simple switch might instantly solve your dead zone.
Step 1: The Zero-Dollar Fix (Optimal Router Placement)
If your Wi-Fi is terrible, there is a very good chance your router is hiding in a terrible spot.
Because routers are usually ugly black boxes with blinking lights, our natural instinct is to hide them. We shove them behind the massive TV in the living room, bury them inside a wooden media console, or toss them in the basement next to the washing machine.
Wi-Fi signals are basically radio waves. They broadcast outward in a dome shape. If you put your router in the far corner of your basement, you are blasting half of your internet signal directly into the dirt outside your foundation.
Furthermore, certain materials are absolute kryptonite to Wi-Fi. Brick, concrete, and metal will stop a signal dead in its tracks. Water is also a massive signal blocker. If you have your router sitting next to a 50-gallon fish tank, your aquatic pets are absorbing all your bandwidth. (Fun fact: 2.4 GHz is the exact same frequency that microwaves use to heat up water molecules!)
How to fix it:
- Centralize it: Move your router as close to the physical center of your home as possible.
- Elevate it: Wi-Fi waves tend to travel slightly downward and outward. Get your router off the floor. Take a quick trip to Home Depot, buy a cheap $15 floating shelf, and mount the router high up on a wall.
- Clear the clutter: Keep it away from microwaves, baby monitors, cordless phones, and large metal appliances.
Step 2: The MacGyver Method (The Aluminum Foil Trick)
Let's say you've moved your router to the best possible spot, but you still have a stubborn dead zone in your back bedroom. Before you drop money on expensive equipment, head to your kitchen pantry.
Yes, we are talking about the aluminum foil trick, and yes, it actually works.
Wi-Fi antennas are usually omnidirectional, meaning they broadcast the signal equally in a 360-degree circle. But if your router is against an exterior wall, you don't need a 360-degree circle. You are wasting 180 degrees of that signal on your neighbor's yard.
You can create a homemade parabolic reflector to catch those wasted signals and bounce them back into your house, effectively boosting the range in a specific direction.
How to do it:
- Grab a roll of heavy-duty aluminum foil (the kind you'd buy at Walmart or Target for a backyard BBQ).
- Cut a piece about the size of a standard sheet of paper.
- Curve the foil into a "C" shape or a half-cylinder.
- Prop this curved foil completely behind your router's antennas, with the open part of the "C" facing toward the dead zone in your house.
It sounds ridiculous, but researchers at Dartmouth College actually tested this and found that a simple foil reflector can significantly boost Wi-Fi signals in a targeted direction. This hack takes three minutes and saves you the $50 to $100 you might have spent on a cheap plug-in Wi-Fi extender.
Step 3: The Budget-Friendly Bridge (Powerline Adapters)
If you live in an older American home with lath and plaster walls, or a house with heavy brick interior walls, Wi-Fi signals simply might not make it through, no matter how much foil you use.
This is where Powerline Adapters come in to save the day.
Powerline adapters are brilliant little devices that turn your home's existing electrical wiring into a massive, high-speed internet cable. They come in a kit with two plugs.
How it works:
- You plug Adapter A into a standard wall outlet near your router, and connect it to the router with a short Ethernet cable.
- You plug Adapter B into a wall outlet in your dead zone (like your upstairs office or basement gaming room).
- You connect Adapter B to your computer, smart TV, or gaming console via another Ethernet cable.
The internet signal travels from your router, into the wall outlet, zips through the copper electrical wiring inside your walls, and pops out perfectly intact in the other room, completely bypassing the thick walls that were blocking your Wi-Fi.
You can pick up a solid Powerline Adapter kit on Amazon or at Best Buy for about $40 to $80. It's an incredibly cost-effective way to get a hardwired, lag-free connection for a home office or a smart TV that constantly buffers.
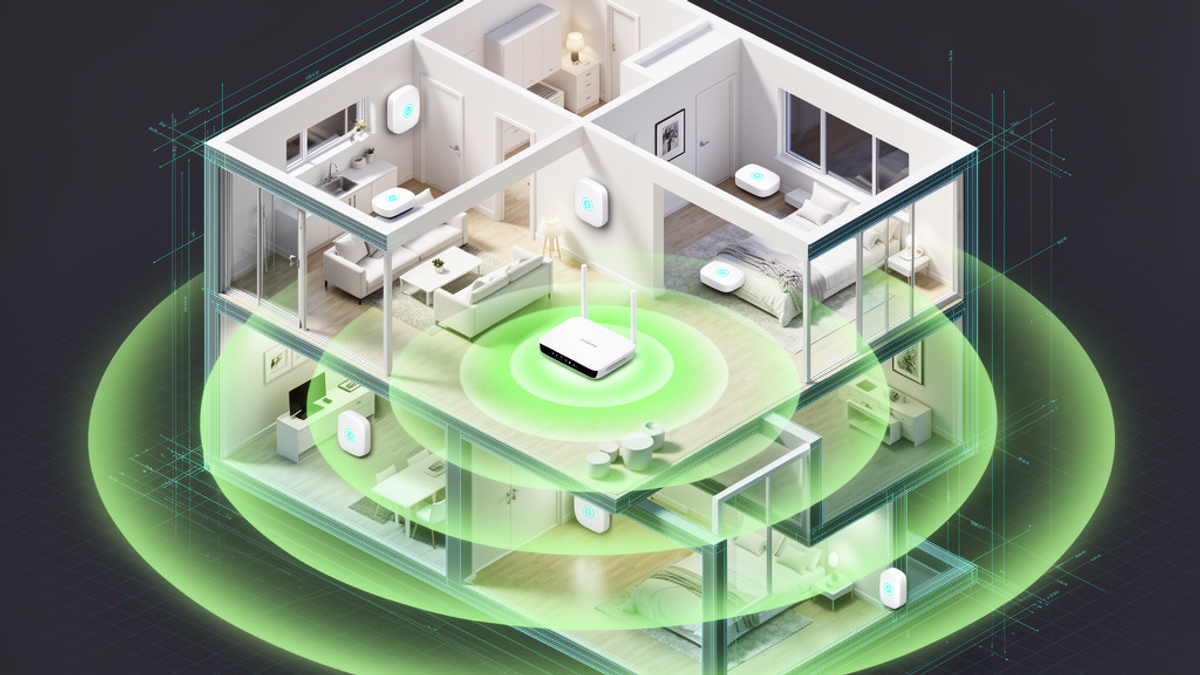
Step 4: The Ultimate Fix (Mesh Wi-Fi Networks)
If you have a larger home (say, over 2,000 square feet), multiple floors, or a sprawling layout, a single router is just not going to cut it. You might be tempted to buy a cheap Wi-Fi extender, but don't do it. Traditional extenders just catch a weak signal, cut the speed in half, and spit it back out under a new network name (like "SmithFamily_EXT"). It forces you to manually switch networks on your phone as you walk around the house, which is a massive headache.
Instead, you need the ultimate solution: a Mesh Wi-Fi Network.
Mesh networks—like Amazon's Eero, Google Nest Wifi, or TP-Link Deco—completely replace your old, clunky router. Instead of one single box trying to shout across your entire house, a mesh system uses three or four sleek, modern "nodes" placed strategically in different rooms.
These nodes communicate with each other seamlessly, creating a single, giant blanket of high-speed Wi-Fi across your entire property.
The best part? There is only one network name. As you walk from the kitchen to the garage, your phone will automatically and instantly connect to whichever node is closest, without dropping your FaceTime call or interrupting your Spotify playlist. It is a completely seamless handoff.
The Cost: Mesh networks are an investment. If you walk into a Best Buy or browse Costco's electronics aisle, expect to spend anywhere from $150 to $300 for a solid 3-pack system.
However, the return on investment is immediate. You'll easily save that much money over a year or two just by not having to burn through your cellular data plan every time you walk into the bathroom. Plus, systems like Eero and Google Wifi are incredibly easy to set up. You just plug them in, download a smartphone app, and the app walks you through the entire process in about ten minutes.
Your Action Plan: What to Do Today
We've covered a lot of ground, but here is your practical, step-by-step game plan to fix your home network today:
- Map the Dead Zones: Walk around your house while streaming a video or using a free speed-test app on your phone. Find exactly where the signal drops.
- Check Your Frequencies: If you're far from the router, make sure your device is connected to the 2.4 GHz network, not the 5 GHz network.
- Relocate the Router: Pull your router out from behind the TV. Get it off the floor, away from the fish tank, and elevate it in a central location in your home.
- Try the Foil Hack: If you just need a little extra push down a hallway, grab some Reynolds Wrap, shape it into a "C", and bounce that signal where it needs to go.
- Invest if Necessary: If you have a large home and you're tired of stressing over dropped Zoom calls, take a trip to Costco or hop online and invest $150-$200 in a mesh network like Eero or Google Nest Wifi.
At Onyx Sound Lab, we believe your home should be a sanctuary of wellness, focus, and peace. Don't let a buffering router hijack your calm. By taking just a few minutes today to optimize your network, you can ensure that whether you're sending money on Zelle, ordering late-night DoorDash, or streaming a deep-sleep frequency meditation, your connection will be rock solid.

SunMaster USA
Editorial Team
The SunMaster USA team finds, tests, and shares the smartest lifehacks, money moves, and home improvement tips that make everyday life easier for American families.